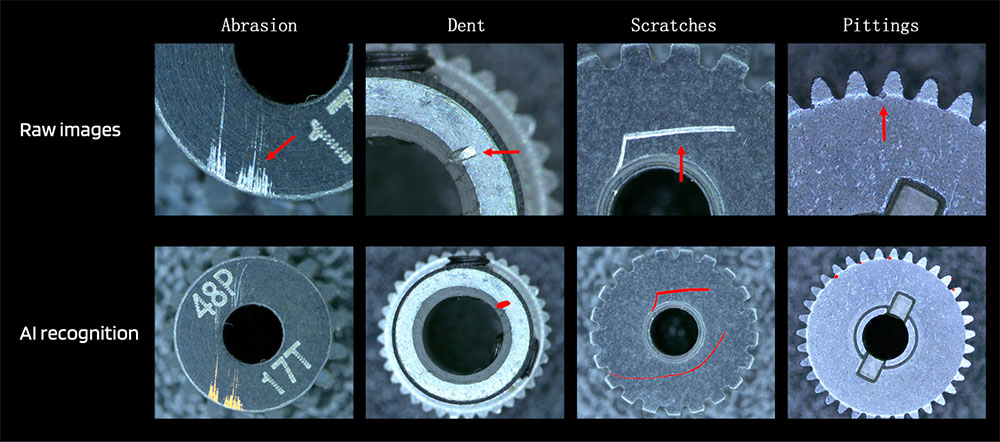
Because gears help change the direction of motion, torque, and speed, they are fundamental to automobile functionality. This application focuses on gear inspection after the machining process.

What manufacturing defects occur?
Gears can encounter several manufacturing defects such as:
These defects affect a gear’s performance, durability, and safety in its application. Manufacturers should implement robust quality control measures throughout the machining process to identify and address defects early on.
However, these defects can be difficult to detect– gears’ steel surfaces may reflect light in a way that masks defects. And many machining defects are subtle and hard to image, especially if the defect’s contrast to the background is low. Traditional machine vision systems struggle to capture clear images and distinguish between actual defects, reflective surfaces, and the background, ultimately missing defects or causing false rejections.
And in high-volume manufacturing environments, gears must be inspected quickly to keep up with production rates. Traditional machine vision products may fail to keep up with required cycle times.
The Solution
UnitX’s AI-powered inspection effectively detects gear defects where other solutions fail.
First, the OptiX imaging system illuminates and images gears. Then, the CorteX Central AI platform is trained on machining defects. Lastly, those AI models are deployed to the CorteX Edge inference system to detect and classify defects in-line.
Alternatively, manufacturers can use just CorteX AI if they have existing imaging systems. For example, if a manufacturer wants to detect internal gear defects, they can deploy just CorteX AI and integrate it with existing X-Ray and CT Scanners for fast deployment of improved defect detection.
Why UnitX for gear machining inspection?
OptiX provides superior images that minimize reflectivity while maximizing defect visibility. It has 32 independently controllable lighting sources that can be optimized for steel gear surfaces and various defects via software. Its computational imaging capability can be used to take multiple shots and eliminate hotspots caused by highly reflective gear surfaces. And its lighting dome design supports a very acute incidence angle of projected light, causing even very tiny defects to cast shadows which increase their visibility.
CorteX accurately detects random, complex defects. It automatically normalizes for variability in positions and orientations and recognizes defects down to the pixel-level. It reduces false positives that lead to scrap and wasted product.
CorteX supports fast AI model development, deployment, and iteration. CorteX AI models are sample efficient– they only require a few images to train on new defect types.
UnitX optimizes yield. In CorteX, can tune quality criteria and visualize the impact on yield before rolling those changes to production. All inspection data is referenceable in one central platform for manufacturers to analyze and identify areas for process improvements.
UnitX provides rapid, 100% inline inspection. OptiX has bright LEDs and fast fly capture speeds of 1m/s for high speed imaging. And CorteX Edge supports high inference speeds (up to 100 MP) to quickly output an OK/NG decision, seamlessly communicating that decision via integration to all major PLC, MES, and FTP systems.
Manufacturers who use UnitX to automate gear machining inspection are able to:
- Prevent quality escapes that impact automobile reliability, performance, and safety
- Reduce scrap by minimizing false rejection rates common with traditional machine vision and identifying defects early in the manufacturing process
- Improve yield by analyzing production and quality data for process improvement opportunities
- Automate inspection at the speed of their production to increase gear manufacturing throughput
UnitX Inspection Example Deep Dive
In this example, we inspected gears for surface defects resulting from the machining process. By inspecting gears before the finishing process, we can catch defects early and minimize waste.
Imaging
First, we used OptiX to capture images of the gears post machining, making sure we captured both defective and OK parts. We used OptiX’s software-defined lighting to configure various lighting patterns and incident angles that best captured the subtle defects.
Training
Next, we used CorteX Central to train our models. We created labels for four defects: abrasion, dent, scratch, and pitting.
We then labeled those defects in the images we captured from OptiX, using just a few images for each defect.
Because of CorteX’s user-friendly interface and the low number of images it requires to train its AI models, it only took us a few minutes to complete the labeling for the four defects.
Detection
We then deployed those AI models to CorteX Edge to detect defects on new gears, resulting in the accurate detection and classification of our four defects.
